Whipped Lemon Icebox Tart

Lemon Icebox Tart

Does food speak to you? It definitely speaks to me, and right now it’s the lemons screaming, “it’s spring, it’s spring!”  I seem to want lemon everything, and as I walked through the grocery store this week, I could almost hear the big bag of beautiful lemons whisper, “take me home”; so I did!

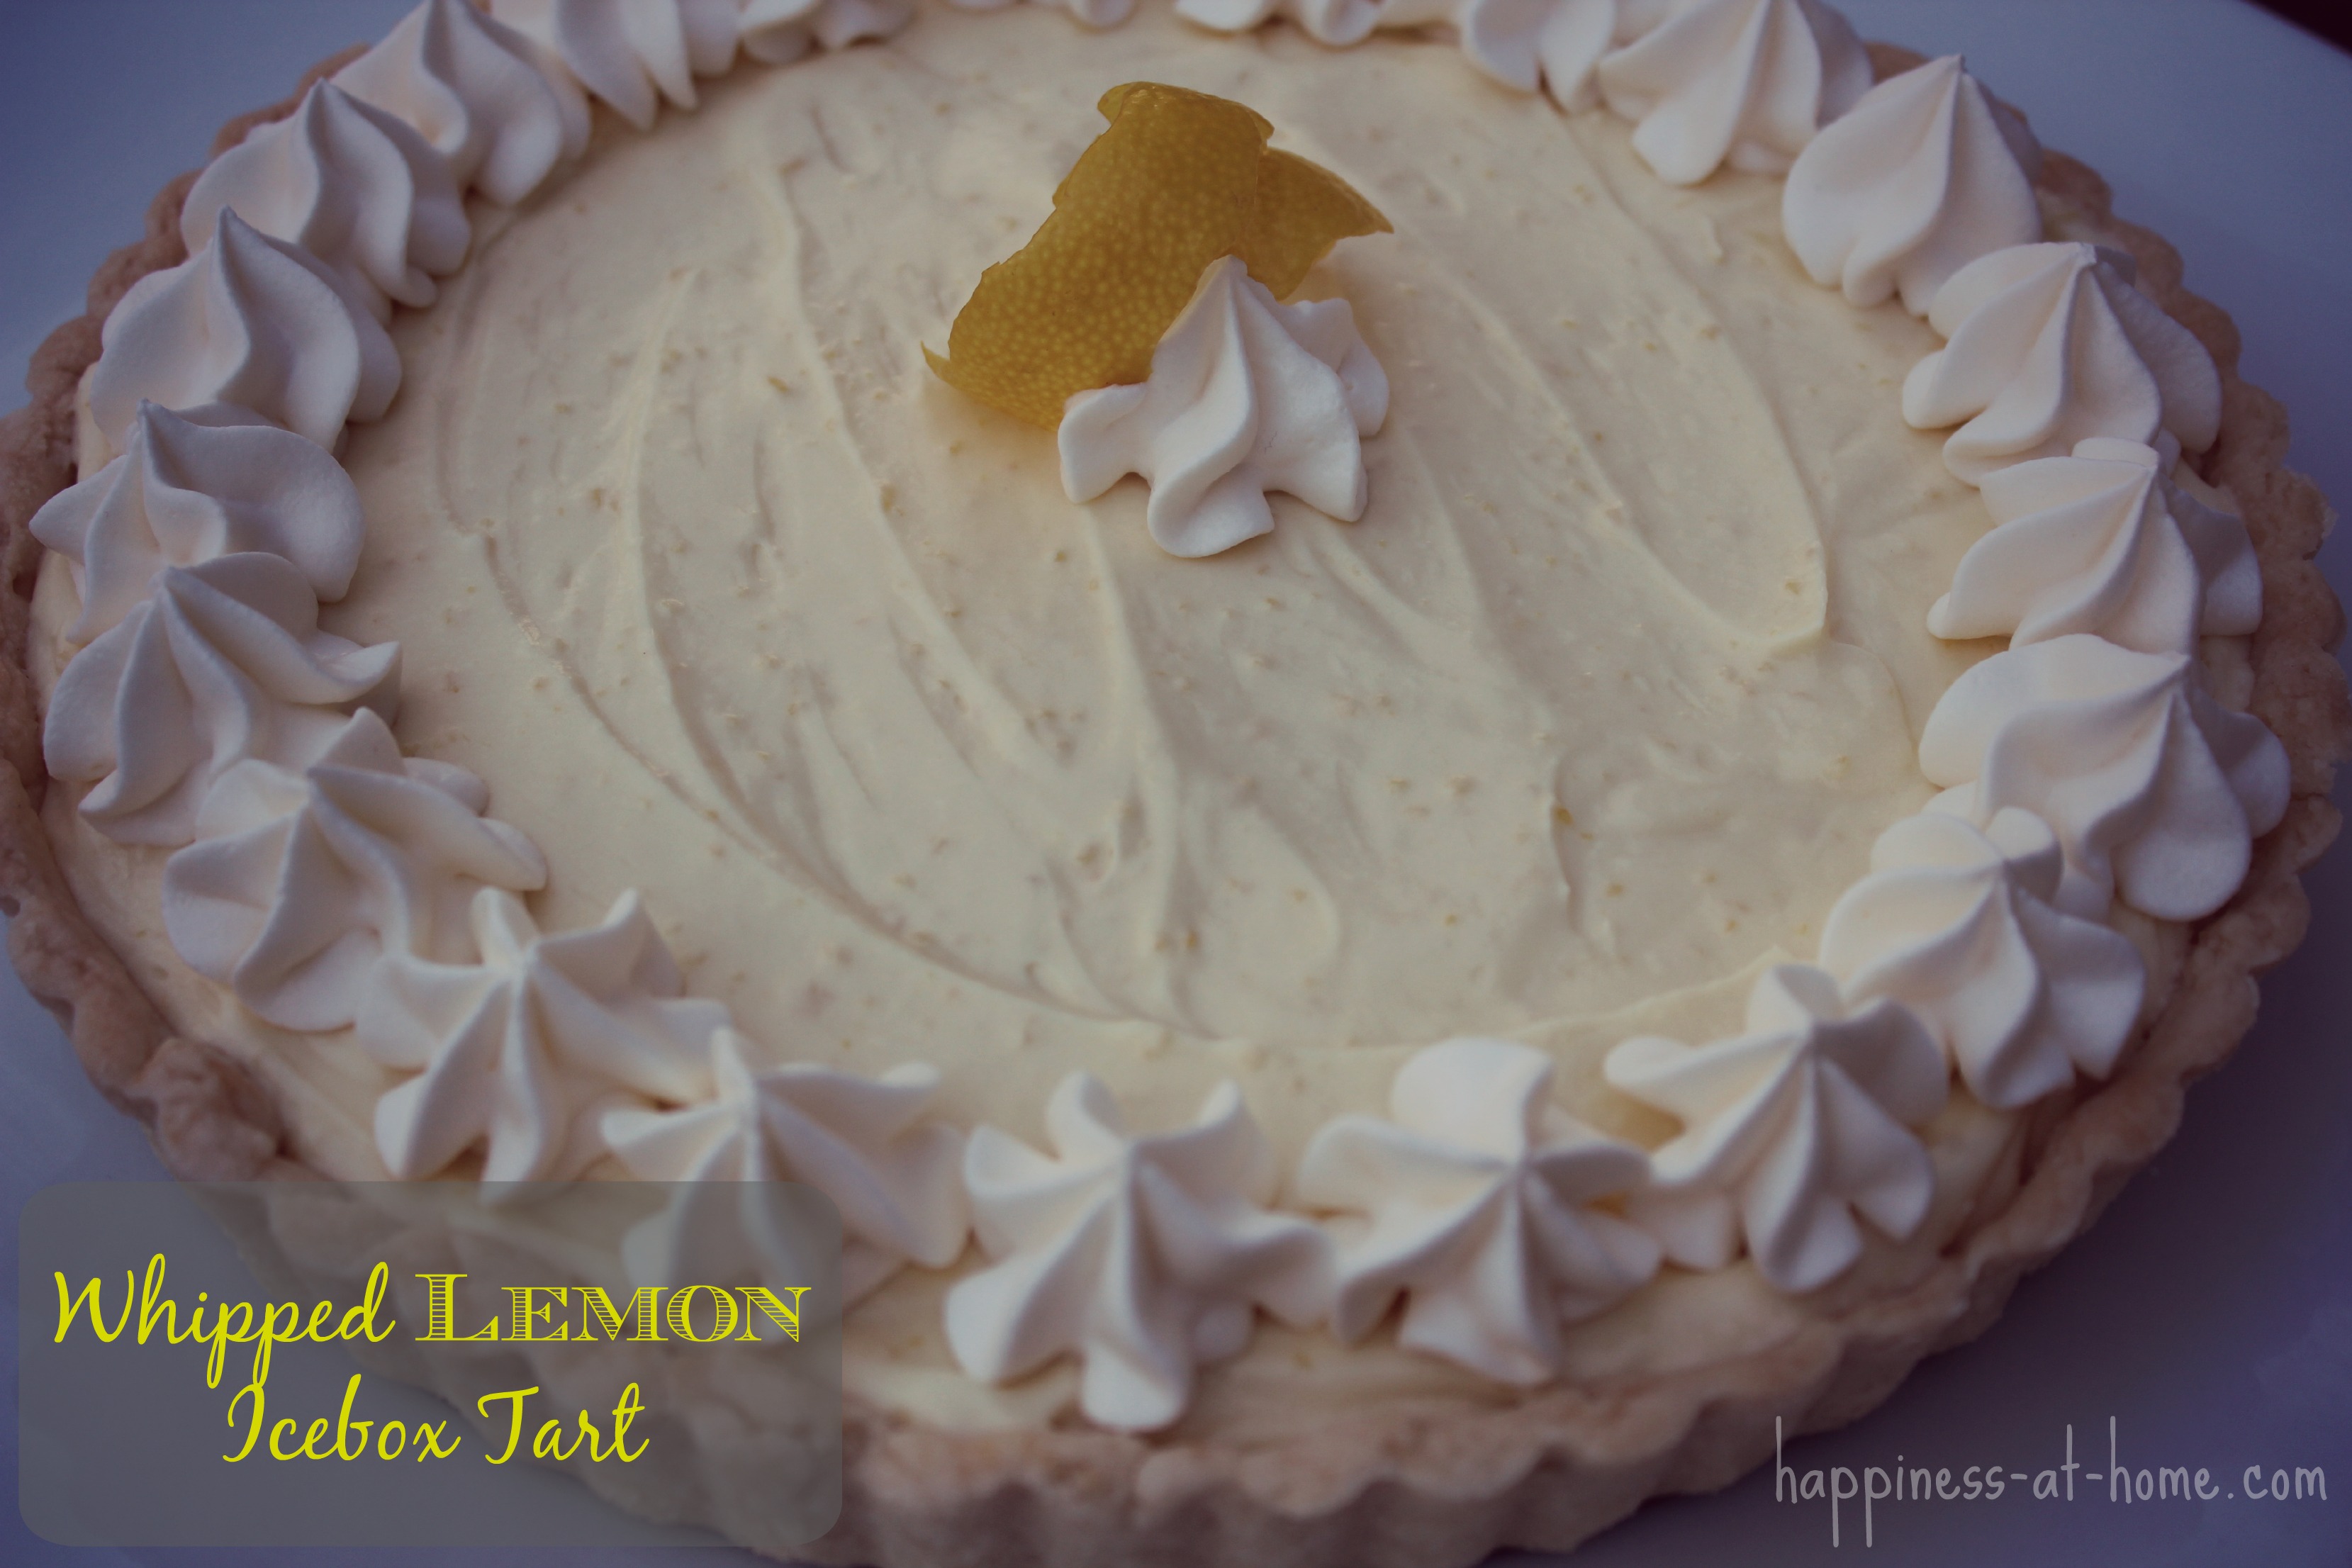
I absolutely love lemon curd – the tanginess that’s still somehow sweet and the silkiness that’s punctuated by bits of lemon zest so that you know it’s the real thing. I could eat it by the bowlful, but I usually try to show some self-control and share my golden treasure with others.

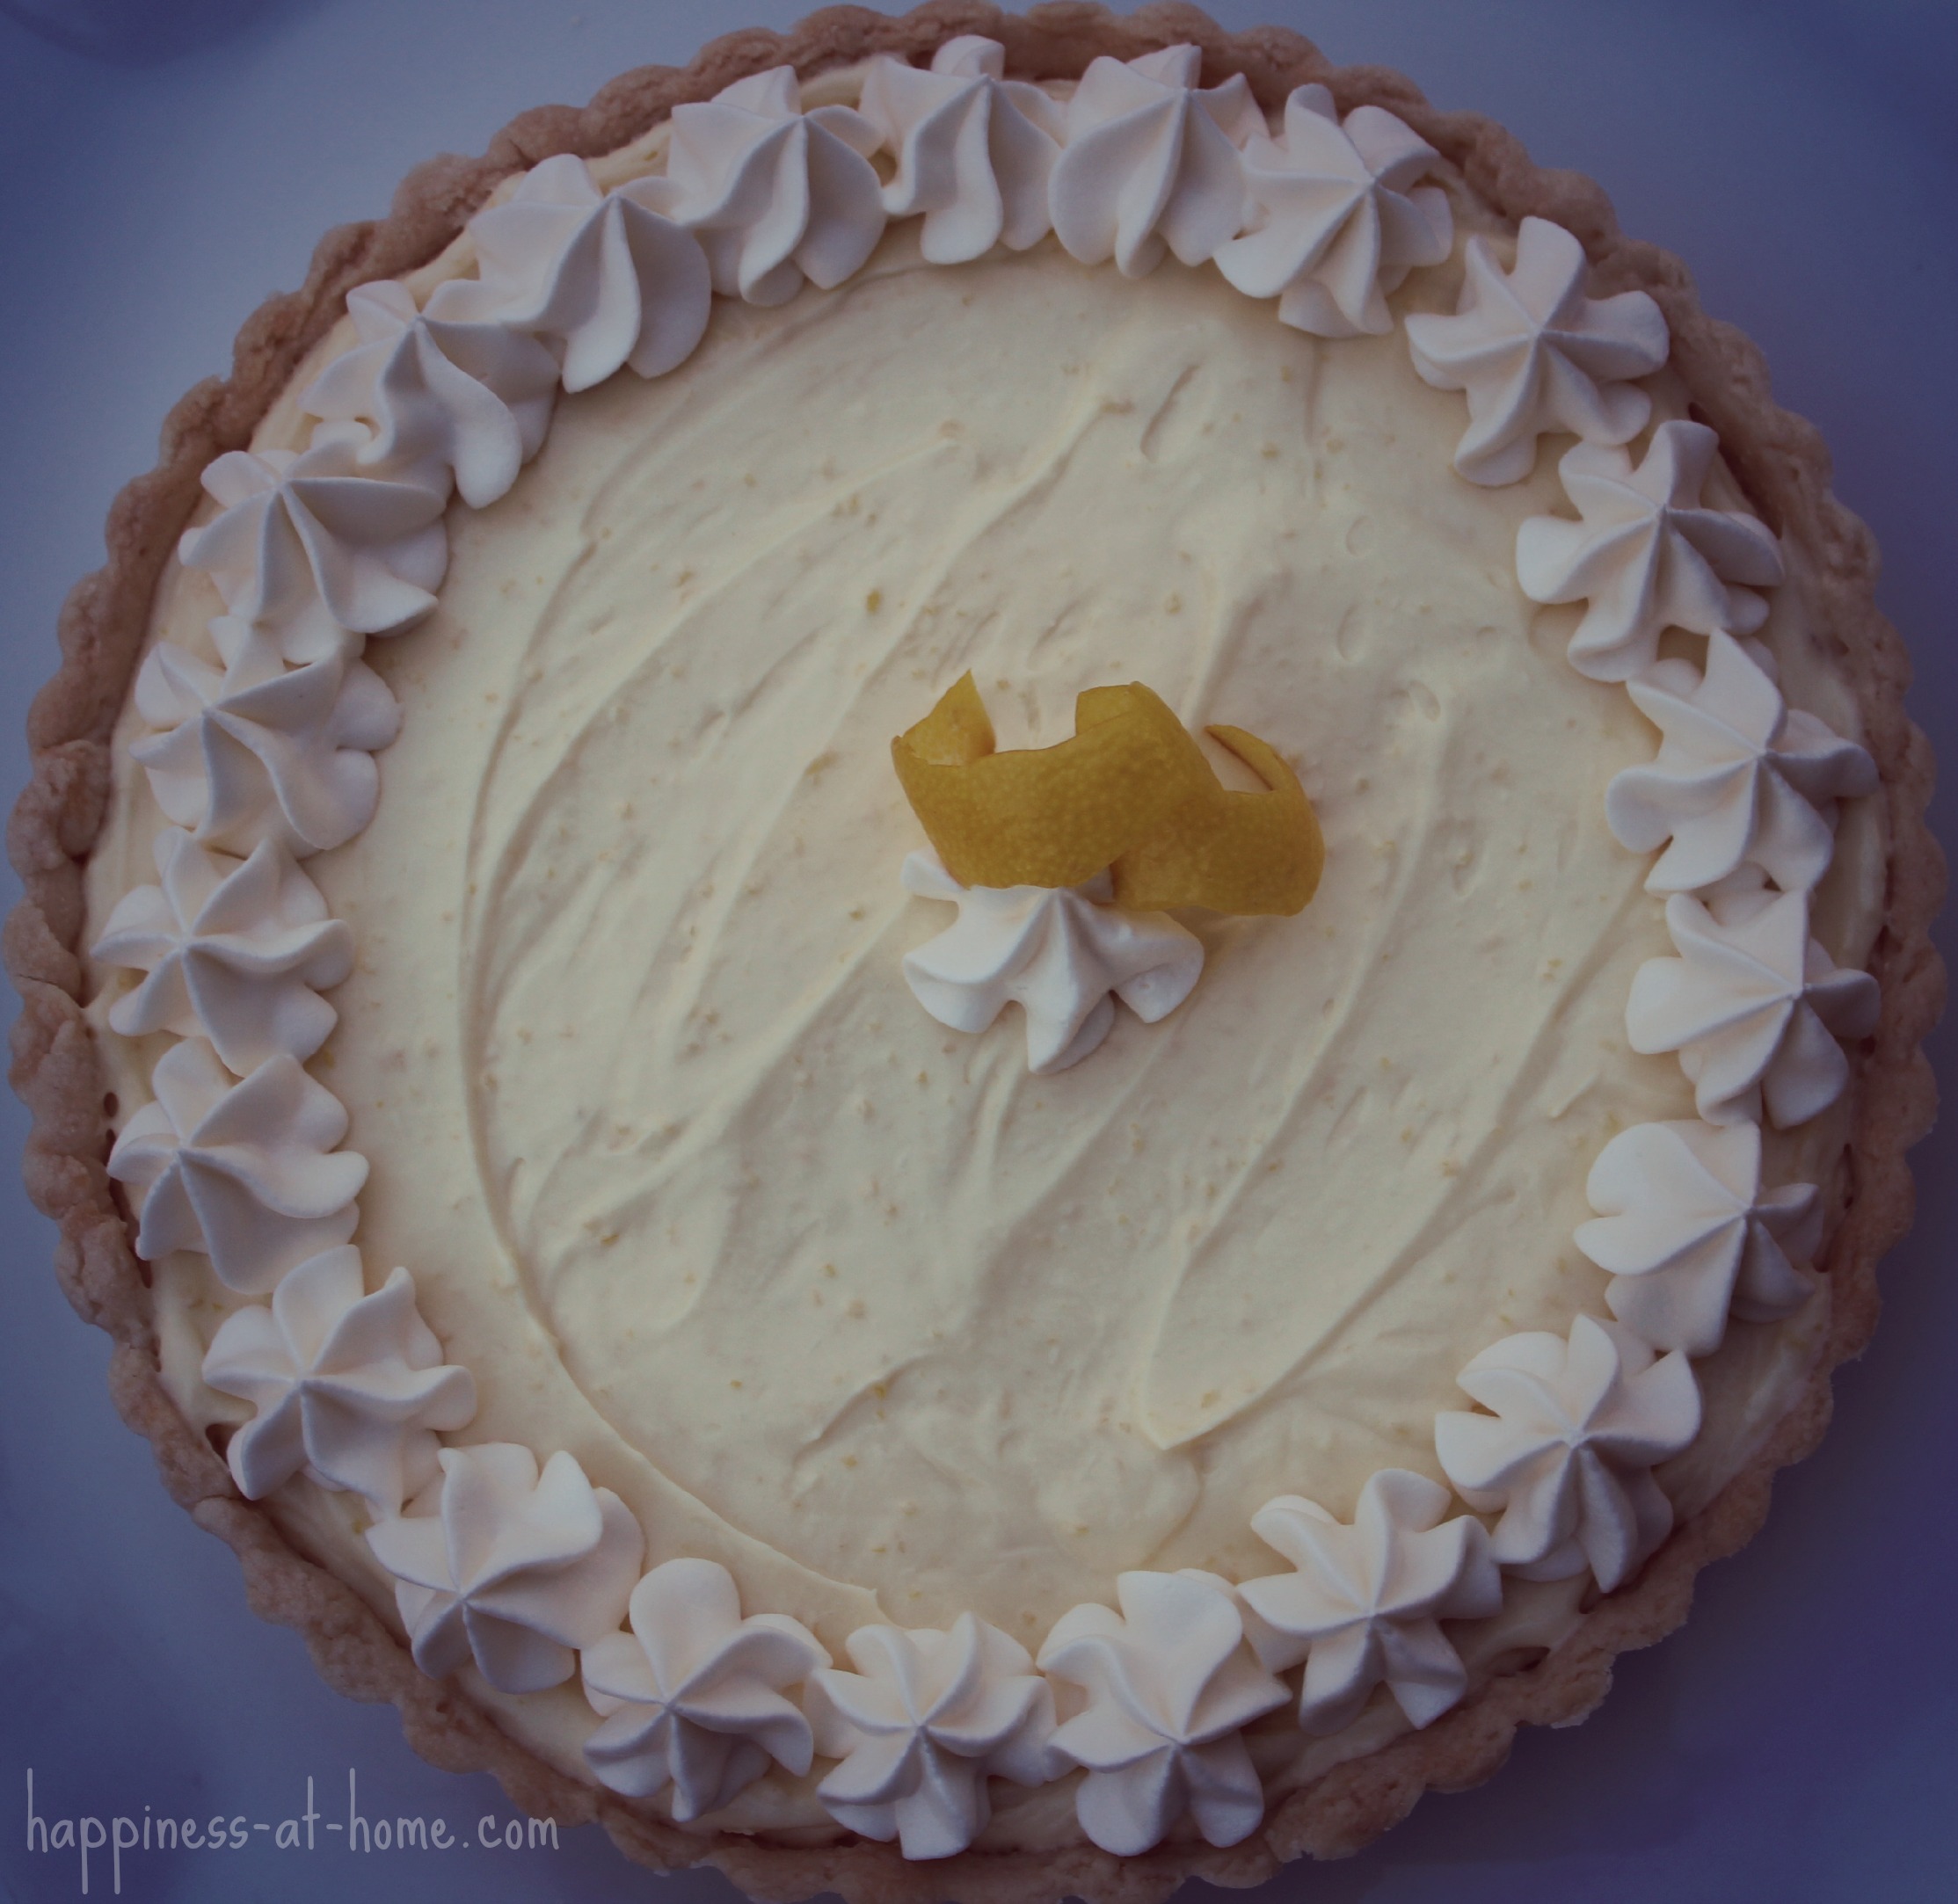
I’ve found that there are some people out there who find the pure lemon curd too overpowering (gasp!), and when serving a crowd, it might be best to town it down a little. I give you, my Whipped Lemon Icebox Tart.

I’d say this is more of a method than a recipe, but hey, maybe it’s something you haven’t thought of! Use your favorite lemon curd recipe (I’ve linked to Ina Garten’s below), and lighten it with homemade or store bought whipped topping. Smooth it into a prepared pie or tart shell, either homemade or store-bought, regular or graham cracker (decisions, decisions), and you have a beautiful spring dessert that’s easy, but sure to impress. I think this Whipped Lemon Icebox Tart would look fabulous on my Easter Table this year!

Lemon Tart

Whipped Lemon Icebox Tart

  • 2 cups homemade Lemon Curd
  • 2 cups freshly whipped Cream or store-bought Whipped Topping, plus extra for decorations if desired
  • 1 baked Pie Crust or Tart Shell, homemade or store bought
  • Lemon Twist for garnish

Place lemon curd in a large bowl. Add one large spoonful of whipped cream, and stir to combine. This will begin to lighten the curd. Add remaining whipped cream and gently fold in until combined. Spoon into pie shell and smooth top.

If desired, place extra whipped cream in a piping bag fitted with a star tip and pipe stars around edge of tart.

Place tart in the freezer for 2-3 hours to set, pull out  30 minutes to an hour before serving. (I like to pull the tart out to display as we sit down to eat, and by the time we are ready for dessert, it’s ready to cut!)

Prosecco Poached Pears

Prosecco Poached Pears

I feel so fancy when I make poached pears. You try it – in your most high and mighty accent say, “and for dessert, we’ll be having poached pears.” Impressive, right?

Really, they’re quite easy, and there are so many ways you can go about it. I like a wine poached pear, but I’m definitely not a sweet wine girl – either for drinking or cooking with. I use a Prosecco (an Italian sparkling wine) to keep it both light and tart, and these pears come out fabulously every time.

The flavor of these poached pears is truly pear. They haven’t been overwhelmed by vanilla or cinnamon or other add ins. They are so simple, and yet, so versatile. I love them plain – just tart, clean, pear. Perfect after a rich meal. However, you could also top them with a scoop of vanilla ice cream or a drizzle of caramel or creme anglaise for a decadent dessert experience. Dice them over your morning oatmeal or slice them for a lavish addition to your cheese board.

The poached pears can be made ahead and easily reheated before serving which makes entertaining a breeze (or for me, a random Tuesday night when it just sounds good!); so next time you want to impress, or just try something new, go with a Prosecco Poached Pear.

Poached Pears

Prosecco Poached Pears

  • 750ml bottle Prosecco
  • 2 tablespoons Honey
  • ½ cup dried Cranberries
  • 4 firm Pears

Peel pears. Remove the core from the bottom leaving the pear intact. Leave the stem on.

Pour Prosecco into a pot just big enough to hold all four pears standing up. Add honey. Turn heat on low and stir to dissolve honey. Carefully stand pears in pot. Add cranberries.

Turn heat to high and bring to a boil. Reduce heat again and simmer with the lid on for 30 to 40 minutes. You can check for doneness at 30 minutes by poking one of the pears with a fork. If the fork goes into the pear very easily, it’s done.

Remove from heat, uncover, and allow to cool completely. Refrigerate until ready to serve.

Reheat over medium high heat for 10-15 minutes. Serve warm. Plain, or with a sauce.

Kale Greens, Simply Dressed

Kale Greens

Kale has always been my favorite in the “greens” family; it’s heartier texture holds up well to cooking and milder flavor pleases my palate. And now, I have found my new favorite way to cook and serve them!

My typical method for greens was to fry up a little bacon, saute some onion in the grease, add the greens with a mixture of water, vinegar, and sugar, and cook down for a few minutes. Top with the bacon and enjoy! That’s how mom makes them, and they are so good that way, but not too long ago I tried something a different, and it was a winner.

When you cook the greens in liquid, they can overcook really quickly (especially when you have a tendency to walk away from the stove for a minute, like yours truly!), which leads to mushy greens – not my favorite. So I got to thinking about how to add the flavor without adding the extra liquid. I decided to lightly saute the greens, and then dress them after they’re done and still warm. It worked wonderfully.

Kale starts as a giant pile of greens that you think will never all fit in your pot, and then it cooks down to such a tiny amount that you’re sure a kale thief broke into your house and stole it all when you weren’t looking. Because it can be so unwieldy at the start of cooking, I always found it hard to make sure all the greens were seasoned evenly while cooking. Waiting until after they are cooked to add my seasoning fixed my problem, and the easiest method for me was to toss them in a simple vinaigrette (plus we all know how much I love a vinaigrette).

The kale comes out crisp-tender and evenly coated with the vinegar flavor that pairs so well with any green, and I feel like I haven’t cooked my veggies to death and still have all of the nutritional benefits of what has come to be known as a “superfood”. Plus, it just tastes super!

Kale Greens with Vinaigrette

  • 2 bunches fresh Kale – rinsed, drained, and roughly chopped
  • 2 tablespoons Olive Oil
  • 1 tablespoon Dijon Mustard
  • 2 tablespoons Red Wine or Apple Cider Vinegar
  • 1 tablespoon Pure Maple Syrup
  • 1/4 teaspoon Salt

Start by making the dressing so that it is ready, as the kale will not take long to cook.

In the bottom of your serving bowl, whisk together mustard, vinegar, maple syrup, and salt. Set aside.

Heat the olive oil in a large pot (really large, I use the biggest soup pot I have) over medium high heat. Add the kale and saute for one minute, tossing and stirring constantly. Reduce heat to medium, cover the pot and steam greens for one more minute.

Place greens in serving bowl with dressing, and toss to coat. Serve immediately.

Asian Marinade and Glaze

Asian Marinade and Glaze

It does my soul good to hear what I call “yum yum” sounds as we all sit down to dinner. The “mmm mmm” and the lip smacking and the mutterings of “oh yum” are what I love to hear, and this marinade and glaze always delivers. Just this week, I even got a “Mommy, you make the best dinners” from the Kiddo, and let me tell you, with a pretty picky 4 year old, that’s a win.

The honey and brown sugar in the marinade caramelize beautifully on the meat as it cooks, and the fresh ginger brings a crisp brightness that can’t be beat. I could just eat the sauce with a spoon, but drizzled over a pork tenderloin or grilled chicken and alongside stir fried veggies works too, I guess.

Asian Marinade and Glaze

  • 1/3 cup Honey
  • 1/4 cup Soy Sauce
  • 1/3 cup Rice Vinegar
  • ½ tablespoon Sesame Oil
  • 3-4 cloves Garlic, minced
  • 1 tablespoon Brown Sugar
  • 1 tablespoon fresh Ginger, grated or finely minced
  • 1 tablespoon Cornstarch
  • 1-2 Green Onions, diced

Combine all ingredients except cornstarch and green onions and whisk together. You will have a little more than 1 cup.

Use one-third cup as a marinade for your meat. Marinate at least 4 hours in the refrigerator. Cook your meat as you normally would.

For the glaze/sauce: Stir cornstarch into 1 tablespoon cold water in a small bowl. Pour reserved marinade into a small sauce pan and mix in cornstarch and water. Heat over medium high heat, stirring frequently, until glaze thickens, about 5 minutes.

Serve meat brushed or drizzled with glaze and topped with green onions.

Cinnamon Chip Scones

Cinnamon Chip Scones

Close your eyes and just imagine with me for a moment – You’re sitting at the breakfast table; the house is filled with the aroma of fresh baked scones. You pick one up; it’s still warm. You break it in half and take that first bite. It’s crisp on the outside, tender and light on the inside, and filled with bites of sweet cinnamon. Sound good? I assure you it is.

I’ve been making these scones for years now, ever since my mom showed up at my door with the best present ever – a bag of cinnamon chips. At the time, we had never seen them before, and I immediately got to work on a recipe to make them shine. Welcome to the world, Cinnamon Chip Scones. You make me so very happy.

These scones freeze beautifully (and I think they actually bake up better when frozen), so I always try to keep some stashed away. Great for busy mornings around the house, a surprise guest, or the “uh oh, I was supposed to bring breakfast” moment we all occasionally have, I can honestly say that stash has come to my rescue more than once.

Cinnamon Chip Scones

  • 4 ¼ cups Flour
  • 1/3 cup Sugar
  • 2 tablespoons Baking Powder
  • 1 teaspoon Salt
  • 3 sticks butter, very cold
  • 1 cup Heavy Cream, plus extra for brushing tops
  • 4 Eggs
  • 1 cup Cinnamon Chips (usually in the Chocolate Chip section)

In the bowl of a food processor, add flour, sugar, baking powder, and salt. Pulse to combine.

Dice butter and add to food processor. Pulse several times until butter is mostly pea sized and combined with the flour mixture. Pour into large bowl, and make a well in the middle.

In a separate bowl, whisk together cream and eggs. Pour into the well in the flour and butter mixture and slowly stir to combine. Stir in cinnamon chips.

On a well-floured surface, knead dough a couple of times to form a ball. Roll dough to about 1” thick. You will probably see bits of butter. This is good! The butter pieces are what makes the dough bake up light and flaky. Use a 3” round cutter to cut scones and place on a parchment lined pan. I usually get about 18 scones.

Cover with plastic wrap and freeze for at least 2 hours. Remove scones from pan and place in zip top bag. Keep them in the freezer until ready to bake.

To bake: Pre-heat oven to 400⁰. Place the desired number of scones two inches apart on a parchment lined pan. Do not defrost scones; they are baked straight from the freezer. Brush the tops with extra heavy cream (this makes them so shiny and pretty!), and if desired sprinkle with a bit of sugar. Bake for 18-20 minutes until golden on top.

Serve plain or with honey-cinnamon butter.

NOTE: Yes, you can bake them in their unfrozen, just stirred together form. However, I always have better results with them frozen. They hold their shape better and do not brown as quickly when baking from frozen. If you get impatient and have to bake some right away, keep an eye on them as the cook time will not be quite as long.

Winter Minestrone from Ina Garten

Ina Garten Winter Minestrone

I knew I wanted to make a big pot of soup this week to combat the frosty chill in the air, so I pulled down some of my favorite recipes to see where inspiration would strike. As I was flipping through chicken soups, vegetable soups, and various takes on chili, I remembered that my mom just saw an Ina Garten episode on the Food Network where she made a minestrone and stirred pesto in at the end. Knowing my love of pesto (evidence here), Mom told me about it, and I thought this week was the perfect time to give it a try.

Let me tell you, it’s a keeper – heading straight to the top of the favorites box.  This is a minestrone that is chock full of great veggies and not too heavy on what I would see as the fillers – beans and pasta.  The carrots hold a bit of their firmness, while the butternut squash melts away to a sweet creaminess in your mouth. The beans and greens give it a heartiness, but at the same time, the broth keeps it light. And the finish of pesto just brings the soup to life as you stir in basil, garlic, and parmesan.

If you’re looking to try out a new soup as this winter is (hopefully) winding down, I highly recommend this one – Ina Garten’s Winter Minestrone.

A couple of notes: I did substitute chopped kale greens instead of the baby spinach. I prefer the flavor and texture of kale and have always thought of it as a perfect complement to butternut squash.  Also, I used my own homemade chicken stock which has some salt in it, so I didn’t use quite as much salt as the recipe calls for.

(And the picture is from the Food Network website; we gobbled ours up before I thought to get a photo!)

Silky Mocha Pie

Mocha Pie

After a couple of posts with nice, healthy recipes, how about today we go with chocolate pie? Don’t mind if I do!

As we were going stir crazy in the house last week, listening to branches crack and fall under the weight of the ice and watching cars slide down the road, there came a time when I needed chocolate. Rich, creamy, pure chocolate is all that would do. So I thought, okay, I can’t get to the grocery store, what do I have in the house to make something fantastic that will lift all of our spirits?

Pie was the answer. Oh, who am I kidding, pie is always the answer! I can easily make a pie crust using pantry staples that we always have on hand. (My go-to is Ina Garten’s Perfect Pie Crust.) Now for the custard filling. Milk? check. Eggs? check. Sugar, vanilla, and dark chocolate? Check, check, and check. At the last minute, I also decided to stir in some coffee granules to go in a more mocha direction, and because I like different textures, some toasted pecans on top for crunch. I used almond milk, but of course, you can use regular. Regular milk may thicken faster than the almond milk; if it gets too thick, just add a splash more milk.

The Hubby and I shared the last piece last night, and I was so sad to see it end. What will I do without my nightly treat of smooth, melt-in-my-mouth chocolate and crunchy pecans? Make another mocha pie, that’s what!

Silky Mocha Pie

  • 1 Pie Crust, store-bought or home made
  • ½ cup White Sugar
  • ½ cup Brown Sugar
  • ¼ teaspoon Salt
  • ¼ cup Cornstarch
  • 2 cups Almond Milk
  • 4 Egg Yolks
  • 6 ounces Dark Chocolate, chopped
  • 1 teaspoon Vanilla
  • 1 tablespoon Instant Coffee Granules
  • ½ cup toasted Pecans, chopped

Fit pie crust into pie pan or tart pan and bake according to package or recipe directions. Let cool completely.

In medium sized sauce pan, mix together white sugar, brown sugar, salt, and cornstarch.

In separate bowl, whisk together milk and egg yolks until well combined. Stir into sugar mixture in pan. Cook over medium high heat, stirring constantly, just until a boil is reached.  It should thicken quickly at this point. Once it thickens enough to coat your spoon, remove from heat and stir in chocolate, vanilla, and coffee until all chocolate is melted and custard is smooth.

Pour into pie shell and chill for at least 2 hours. Top with toasted pecans before serving.

Black Bean & Quinoa Sliders

Black Bean and Quinoa Sliders

I’m not a vegetarian, but when there’s meatless food that tastes this good, I easily could be.

This is a recipe I developed while experimenting with some ideas for easy, healthy lunches for the days that I’m busy around the house, and I could not be happier with these sliders. We had these for dinner one night last week, and then I ate the rest for my lunches (except for a couple which I gave to my mom to try!).

The texture came out perfect – crispy on the outside and tender on the inside. The black beans give the sliders a hearty creaminess and the quinoa almost pops in your mouth. Garlic, green onion and cumin add the punch of flavor that you just can’t beat.

I served my sliders on mini ciabatta buns with avocado, and loved them! Then my mom said she put hers in a pita pocket with a smear of hummus, so I tried that and loved them even more! I will definitely be making another batch to have for my lunches next week. Don’t worry Mom, I’ll bring you some too!

Black Bean and Quinoa Burgers 2

Black Bean and Quinoa Sliders

  • ½ cup uncooked Quinoa
  • 1 cup Water
  • 1 can Black Beans, drained and rinsed
  • 1 Green Onion, diced
  • 2 cloves Garlic, rough chopped
  • 1 teaspoon Salt
  • 1 teaspoon Cumin
  • 1 Egg, beaten

Cook quinoa in the water according to package directions. Let cool. (This can be done ahead.) Place in large bowl.

Pulse black beans, green onion, and garlic in a food processor until finely chopped. Place in bowl with quinoa. Add salt and cumin, mix well. Stir in beaten egg until combined.

Using your hands (wet hands can help if the mixture is too sticky), form patties of your desired size. I used a 2” ice cream scoop to make slider size patties.

Place patties on a parchment lined baking sheet. Refrigerate at least an hour.

Preheat oven to 475⁰. Bake for 12 minutes, then flip patties and bake another 10 minutes. Remove from oven and serve immediately.

This recipe makes 9 slider sized patties.


Butternut Squash and Asparagus Lasagna Rolls with Cauliflower Sauce

Butternut Squash Lasagna Rolls

Do you ever get an idea in your head, and you just can’t let it go until you do something with it? For me, it happens all the time, and almost always has something to do with food.  I’ll think about flavor combinations and twists on old favorites and practically obsess about an idea until I just have to get what I need from the store and make it happen. Does it always come out just as I had imagined? Um, no. Does it always come out edible? Sadly,the answer is still no. But I keep trying, and this one here, this one was a success!

I started thinking about butternut squash, asparagus, and pancetta a while ago. I knew I wanted to put them together, and finally, I decided to go with a lasagna roll. I’ve always loved putting different flavors and textures together in a lasagna, and rolling the individual pasta sheets always makes for such a nice presentation.

I was stuck on the sauce. Alfredo? Brown butter sage? Both good options, but instead I chose to give a new one a try. These days you can’t spend any time on Pinterest without seeing ten different versions of a cauliflower sauce, so why not jump on the bandwagon? I looked at several recipes and came up with my method below, but by no means should I take credit for inventing cauliflower sauce. Thanks to everyone who came before me!

I will say, oh my goodness that sauce is good! I wanted to just eat it right out of the blender. It’s very similar to an alfredo sauce. Even the Hubby liked it! Of course, after I told him what it was, he renamed it “al-fraud-o sauce”. He’s so clever.

All kidding aside, this is one yummy dish. The sweet butternut squash, the salty pancetta, and bright asparagus all wrapped in al dente pasta and topped with a light, creamy sauce. Fantastic.


Butternut Squash Lasagna Rolls Assembly

Butternut Squash Lasagna Rolls 2

Butternut Squash and Asparagus Lasagna Rolls with Cauliflower Sauce

Cauliflower Sauce

  • 1 head Cauliflower, cut into florets
  • 3 cups Chicken or Vegetable Broth
  • 2 cloves Garlic, halved
  • 1/2 teaspoon Salt
  • 1/8 teaspoon Pepper
  • 1/4 cup Butter, melted

Lasagna Rolls

  • 3 cups Roasted Butternut Squash (about half a butternut squash)
  • ½ pound Asparagus, diced
  • 4 ounces diced Pancetta
  • 12 Lasagna Noodles

For the cauliflower sauce – Bring chicken broth to a boil in a medium sized pot. Reduce to simmer, add cauliflower and garlic and cook, covered for 15 minutes. Using a slotted spoon, transfer cooked cauliflower and garlic to a blender. Reserve ¼ cup cooking liquid. Blend slightly, then add salt, pepper, reserved liquid, and melted butter and blend until pureed. Set aside.

For the lasagna rolls – Mash or puree roasted butternut squash to desired consistency. Add a bit of liquid if needed.  I like mine thick, so I just mash it. Set aside.

Cook pancetta over medium high heat for 5 minutes, then add diced asparagus and cook another 3 minutes, stirring frequently. Set aside.

While cooking pancetta and asparagus, cook lasagna noodles according to package directions. Drain and lay out on a greased baking pan so they don’t stick.

Spread each noodle with the butternut squash, leaving a ½ inch border at one end. Top with pancetta and asparagus, dividing evenly among the noodles. Roll each noodle starting with the end opposite the ½ inch border.

Coat an 8×10 pan with non-stick spray. Spread ½ cup of cauliflower sauce in bottom of pan. Place each lasagna roll, seam side down, in the prepared pan. Top evenly with remaining cauliflower sauce.

Bake uncovered at 350⁰ for 20-25 minutes.

Chicken and Mushroom Pasta in a Sun-Dried Tomato and White Wine Sauce

Chicken and Mushroom Pasta

 I love going out eat, having a nice dinner, and then coming home inspired to try and recreate what I just had. That’s what this pasta dish is – my version of one of my favorite dishes from a chain restaurant we pop into every once in a while.

The original dish has a garlic cream sauce, but since the cream won’t work for me, I’ve re-worked it to be dairy free. I make a sauce using garlic, chicken broth, and white wine which comes out so light and tasty. I love the distinct flavor of sun-dried tomatoes and didn’t want to add too much to take away from what I might consider to be the star of the dish.

This is one of those comforting pasta dishes that I can’t get enough of, and since I cut out the heavy cream, I feel pretty good about it, but for all you cream and cheese lovers, a splash of cream and a handful of Parmesan at the end would probably be quite fabulous.

A fairly simple ingredient list makes a snap to put together (especially if you go ahead and cook your chicken and mushrooms in advance), and easily works as one of our busy weeknight meals.

Side note: The day I made this for the blog, I was out of parsley! As soon as I make it again, I’ll retake the picture and update it. For now, we have a no-parsley picture, but it does make a difference in the dish!

Chicken and Mushroom Pasta with Sun-Dried Tomato and White Wine Sauce

  • 8 oz container of White Mushrooms, quartered
  • 1 tablespoon Olive Oil
  • 2-3 cloves Garlic, minced
  • 4 tablespoons Butter
  • 4 tablespoons Flour
  • 1 ½ cups Chicken Broth
  • ¾ cup White Wine
  • ½ teaspoon Salt
  • ¼ teaspoon Pepper
  • 1 tablespoon chopped fresh Parsley
  • ½ cup diced Sun-Dried Tomatoes
  • 2 large or 3 medium cooked Chicken Breasts, diced
  • 1 pound pasta, cooked and drained according to package directions, reserve ½ cup pasta water
  • Freshly grated Parmesan for serving, if desired

Sauté mushrooms in olive oil 5 minutes, or until done. Set aside.

Melt butter over medium high heat in large pan with high sides. Add garlic and cook for 30 seconds. Add in flour, and stir constantly for 1 minute until there are no lumps.

Slowly whisk in broth and wine. Stirring constantly, cook for 3-4 minutes until thick and creamy.

Stir in salt, pepper, parsley, and sun-dried tomatoes. Simmer sauce for another minute.

Add cooked pasta, chicken, and mushrooms. Toss to combine. Stir in reserved pasta water to thin sauce a bit if needed.

If desired, serve topped with freshly grated Parmesan cheese.