When Life Changes in an Instant

Everyone always tells you not to take anything for granted, but I guess you never really hear those words until something forces you to.

Early on the morning of March 23rd, I had just stepped out of the shower when I received a phone call from my dad. Something had happened, the ambulance was taking my mom to the hospital, could I meet them there. I threw on some clothes and raced to the car. It took me less than 10 minutes to get there in the early morning hours, but I was too late. At 57, my mom was dead from a brain aneurysm. I remember being told there was nothing anyone could have done. I remember feeling like the world had dropped out from beneath me. I was just hanging in this suspension of disbelief.

I’m not writing this for sympathy. Sympathy we’ve got. My mom touched so many people, and the outpouring of love and support has been amazing and overwhelming, and we are so grateful to everyone in our lives for being with us at this time. I’m writing this because I seem to just need to get it out. Putting that day into words seems to be the therapy I need right now. I’m also writing this to let you know that I will be taking a break from the blog for a while.

My mom was my first phone call every morning. She was the one who not only taught me to cook, but taught me to love cooking. She was the first one to hear of my successes (and failures!) in the kitchen, and my main recipe swapping buddy. Mom didn’t mind the dirty work of sanding furniture or digging in the yard and was right beside me for most of my projects around the house.

Mom was proud of this blog, and always wanted to know what was coming up. She was my biggest cheerleader, telling all of her friends about it, and I know she would want me to continue. I do plan to continue, but for now, writing about the recipes she taught me and the projects she wanted to help me with is too hard.

It’s been two weeks, and I’m still swimming in emotions and thoughts about life, love, and loss.  I have so many words about making more time for the ones you love, but I think for now, the best thing for me to do is to leave it all alone and just try to be at peace. Thank you for your support and understanding; I hope to be back sooner rather than later.

Whipped Lemon Icebox Tart

Lemon Icebox Tart

Does food speak to you? It definitely speaks to me, and right now it’s the lemons screaming, “it’s spring, it’s spring!”  I seem to want lemon everything, and as I walked through the grocery store this week, I could almost hear the big bag of beautiful lemons whisper, “take me home”; so I did!

I absolutely love lemon curd – the tanginess that’s still somehow sweet and the silkiness that’s punctuated by bits of lemon zest so that you know it’s the real thing. I could eat it by the bowlful, but I usually try to show some self-control and share my golden treasure with others.

I’ve found that there are some people out there who find the pure lemon curd too overpowering (gasp!), and when serving a crowd, it might be best to town it down a little. I give you, my Whipped Lemon Icebox Tart.

I’d say this is more of a method than a recipe, but hey, maybe it’s something you haven’t thought of! Use your favorite lemon curd recipe (I’ve linked to Ina Garten’s below), and lighten it with homemade or store bought whipped topping. Smooth it into a prepared pie or tart shell, either homemade or store-bought, regular or graham cracker (decisions, decisions), and you have a beautiful spring dessert that’s easy, but sure to impress. I think this Whipped Lemon Icebox Tart would look fabulous on my Easter Table this year!

Lemon Tart

Whipped Lemon Icebox Tart

  • 2 cups homemade Lemon Curd
  • 2 cups freshly whipped Cream or store-bought Whipped Topping, plus extra for decorations if desired
  • 1 baked Pie Crust or Tart Shell, homemade or store bought
  • Lemon Twist for garnish

Place lemon curd in a large bowl. Add one large spoonful of whipped cream, and stir to combine. This will begin to lighten the curd. Add remaining whipped cream and gently fold in until combined. Spoon into pie shell and smooth top.

If desired, place extra whipped cream in a piping bag fitted with a star tip and pipe stars around edge of tart.

Place tart in the freezer for 2-3 hours to set, pull out  30 minutes to an hour before serving. (I like to pull the tart out to display as we sit down to eat, and by the time we are ready for dessert, it’s ready to cut!)

Storage Crate turned Side Table

I have a garage full of projects just waiting for me to jump back in – furniture to be refinished, items to be repurposed, and a few things that need a major overhaul. Slowly but surely, I’m coming out of a long winter’s hibernation (and getting out of the kitchen a bit!), and I am so excited to get my hands back on my sander and paintbrush.

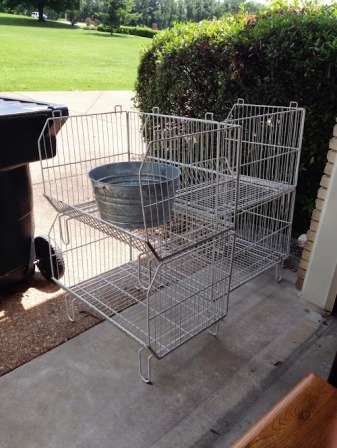
I picked back up where I left off last year, with an idea to turn a sturdy wire storage bin into a cool, industrial-like side table. I snagged several of these storage bins after one of my craigslist searches for anything that catches my eye. A warehouse here in town was cleaning out, and I cleaned up!

wire crates

Original purpose – stack them up in your garage for storage. Me – add a table top and have a cool place to stash kid’s toys. My intention is actually to use it as a TV stand in our playroom and toss in the Kiddo’s various bits of sports equipment, but until I give the playroom a major renovation, you won’t be getting a picture of that anytime soon.

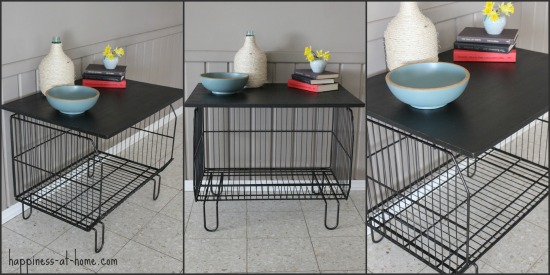
 Wire Crate Table

I’m really happy with the result, and think this will be a versatile piece that I can move around where needed. For an easy DIY project, it’s a keeper. Here’s my how-to:

  • I spray painted the wire crate with Krylon Oil Rubbed Bronze. I love how it looks, but if I do another one, I’ll seriously consider just touching up the white color that’s already there.  With a wire crate, there was so much waste of spray paint, that I’m not sure it was worth trying to change the color.
  • I measured the size of the top I needed, and then went to my favorite Home Depot and purchased a 3/4″ thick piece of pre-sanded plywood. I had them make a couple of cuts for me, and then my handy dad was nice enough to make a couple more.
  • When I brought my table top home, I went ahead and sanded it even though it was a pre-sanded piece. I wanted to make sure it was nice and smooth, and the rough edges from the cuts needed a little attention. I used a 100 grit sandpaper.
  • The table top was painted with 2 coats of flat black (my favorite black is Black Suede by Behr), and then lightly sanded with a 220 grit sandpaper. I did a little more on the edges and corners to give it a distressed look. Then I wiped it all down with a damp cloth.
  • I wiped a Golden Pecan stain over the entire table top piece and let it dry overnight. Then I used a wipe on Polyurethane  (2 coats) to seal it. The black distressed paint with a light stain looks great with the oil rubbed bronze color of the crate.
  • Finally, I was ready for assembly! I used U-shaped brackets from the closet section of the hardware store to affix the underside of the table top to the wire crate. And done!

The 3/4″ plywood is sturdy enough to hold our TV and the storage works great for larger toys. I may go ahead and do another one for a bed-side table when we change over to a “big boy bedroom” for the Little Man.

Menu Monday – #11

I must have gotten carried away last week. I cooked like were a family of 12, and we still have food coming out of our ears! So, we’ll start our week with a leftovers night (easy for me!), and then get rolling onto a yummy St. Patrick’s Day dinner with all of the family over for some fun. Have a good week, everyone!

MONDAY

Leftovers from last week

TUESDAY

Corned Beef and Cabbage, Herbed Potatoes and Carrots, Irish Soda Bread

WEDNESDAY

Taco Casserole

THURSDAY

Chicken Marsala

FRIDAY

Make Your Own Pizza Party

Prosecco Poached Pears

Prosecco Poached Pears

I feel so fancy when I make poached pears. You try it – in your most high and mighty accent say, “and for dessert, we’ll be having poached pears.” Impressive, right?

Really, they’re quite easy, and there are so many ways you can go about it. I like a wine poached pear, but I’m definitely not a sweet wine girl – either for drinking or cooking with. I use a Prosecco (an Italian sparkling wine) to keep it both light and tart, and these pears come out fabulously every time.

The flavor of these poached pears is truly pear. They haven’t been overwhelmed by vanilla or cinnamon or other add ins. They are so simple, and yet, so versatile. I love them plain – just tart, clean, pear. Perfect after a rich meal. However, you could also top them with a scoop of vanilla ice cream or a drizzle of caramel or creme anglaise for a decadent dessert experience. Dice them over your morning oatmeal or slice them for a lavish addition to your cheese board.

The poached pears can be made ahead and easily reheated before serving which makes entertaining a breeze (or for me, a random Tuesday night when it just sounds good!); so next time you want to impress, or just try something new, go with a Prosecco Poached Pear.

Poached Pears

Prosecco Poached Pears

  • 750ml bottle Prosecco
  • 2 tablespoons Honey
  • ½ cup dried Cranberries
  • 4 firm Pears

Peel pears. Remove the core from the bottom leaving the pear intact. Leave the stem on.

Pour Prosecco into a pot just big enough to hold all four pears standing up. Add honey. Turn heat on low and stir to dissolve honey. Carefully stand pears in pot. Add cranberries.

Turn heat to high and bring to a boil. Reduce heat again and simmer with the lid on for 30 to 40 minutes. You can check for doneness at 30 minutes by poking one of the pears with a fork. If the fork goes into the pear very easily, it’s done.

Remove from heat, uncover, and allow to cool completely. Refrigerate until ready to serve.

Reheat over medium high heat for 10-15 minutes. Serve warm. Plain, or with a sauce.

Kale Greens, Simply Dressed

Kale Greens

Kale has always been my favorite in the “greens” family; it’s heartier texture holds up well to cooking and milder flavor pleases my palate. And now, I have found my new favorite way to cook and serve them!

My typical method for greens was to fry up a little bacon, saute some onion in the grease, add the greens with a mixture of water, vinegar, and sugar, and cook down for a few minutes. Top with the bacon and enjoy! That’s how mom makes them, and they are so good that way, but not too long ago I tried something a different, and it was a winner.

When you cook the greens in liquid, they can overcook really quickly (especially when you have a tendency to walk away from the stove for a minute, like yours truly!), which leads to mushy greens – not my favorite. So I got to thinking about how to add the flavor without adding the extra liquid. I decided to lightly saute the greens, and then dress them after they’re done and still warm. It worked wonderfully.

Kale starts as a giant pile of greens that you think will never all fit in your pot, and then it cooks down to such a tiny amount that you’re sure a kale thief broke into your house and stole it all when you weren’t looking. Because it can be so unwieldy at the start of cooking, I always found it hard to make sure all the greens were seasoned evenly while cooking. Waiting until after they are cooked to add my seasoning fixed my problem, and the easiest method for me was to toss them in a simple vinaigrette (plus we all know how much I love a vinaigrette).

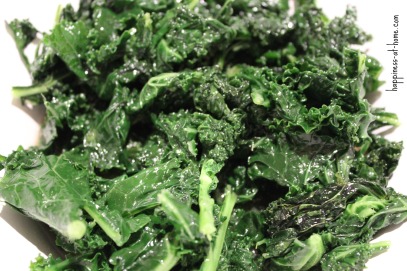
The kale comes out crisp-tender and evenly coated with the vinegar flavor that pairs so well with any green, and I feel like I haven’t cooked my veggies to death and still have all of the nutritional benefits of what has come to be known as a “superfood”. Plus, it just tastes super!

Kale Greens with Vinaigrette

  • 2 bunches fresh Kale – rinsed, drained, and roughly chopped
  • 2 tablespoons Olive Oil
  • 1 tablespoon Dijon Mustard
  • 2 tablespoons Red Wine or Apple Cider Vinegar
  • 1 tablespoon Pure Maple Syrup
  • 1/4 teaspoon Salt

Start by making the dressing so that it is ready, as the kale will not take long to cook.

In the bottom of your serving bowl, whisk together mustard, vinegar, maple syrup, and salt. Set aside.

Heat the olive oil in a large pot (really large, I use the biggest soup pot I have) over medium high heat. Add the kale and saute for one minute, tossing and stirring constantly. Reduce heat to medium, cover the pot and steam greens for one more minute.

Place greens in serving bowl with dressing, and toss to coat. Serve immediately.

Menu Monday – #10

I cooked a chicken this weekend as we were still thawing out from our second round of ice storms. It made me just feel better to have yummy smells coming from the kitchen. So, fresh broth and shredded chicken means its a chicken and rice soup week! Comfort food at it’s best.

MONDAY

Roasted Turkey Breast with Root Vegetables

TUESDAY

Fried Pork Chops and Mashed Potatoes with Gravy

WEDNESDAY

Chicken & Rice Soup

THURSDAY

Grilled Bratwursts with Hashbrowns

FRIDAY

Leftovers

Asian Marinade and Glaze

Asian Marinade and Glaze

It does my soul good to hear what I call “yum yum” sounds as we all sit down to dinner. The “mmm mmm” and the lip smacking and the mutterings of “oh yum” are what I love to hear, and this marinade and glaze always delivers. Just this week, I even got a “Mommy, you make the best dinners” from the Kiddo, and let me tell you, with a pretty picky 4 year old, that’s a win.

The honey and brown sugar in the marinade caramelize beautifully on the meat as it cooks, and the fresh ginger brings a crisp brightness that can’t be beat. I could just eat the sauce with a spoon, but drizzled over a pork tenderloin or grilled chicken and alongside stir fried veggies works too, I guess.

Asian Marinade and Glaze

  • 1/3 cup Honey
  • 1/4 cup Soy Sauce
  • 1/3 cup Rice Vinegar
  • ½ tablespoon Sesame Oil
  • 3-4 cloves Garlic, minced
  • 1 tablespoon Brown Sugar
  • 1 tablespoon fresh Ginger, grated or finely minced
  • 1 tablespoon Cornstarch
  • 1-2 Green Onions, diced

Combine all ingredients except cornstarch and green onions and whisk together. You will have a little more than 1 cup.

Use one-third cup as a marinade for your meat. Marinate at least 4 hours in the refrigerator. Cook your meat as you normally would.

For the glaze/sauce: Stir cornstarch into 1 tablespoon cold water in a small bowl. Pour reserved marinade into a small sauce pan and mix in cornstarch and water. Heat over medium high heat, stirring frequently, until glaze thickens, about 5 minutes.

Serve meat brushed or drizzled with glaze and topped with green onions.

Cinnamon Chip Scones

Cinnamon Chip Scones

Close your eyes and just imagine with me for a moment – You’re sitting at the breakfast table; the house is filled with the aroma of fresh baked scones. You pick one up; it’s still warm. You break it in half and take that first bite. It’s crisp on the outside, tender and light on the inside, and filled with bites of sweet cinnamon. Sound good? I assure you it is.

I’ve been making these scones for years now, ever since my mom showed up at my door with the best present ever – a bag of cinnamon chips. At the time, we had never seen them before, and I immediately got to work on a recipe to make them shine. Welcome to the world, Cinnamon Chip Scones. You make me so very happy.

These scones freeze beautifully (and I think they actually bake up better when frozen), so I always try to keep some stashed away. Great for busy mornings around the house, a surprise guest, or the “uh oh, I was supposed to bring breakfast” moment we all occasionally have, I can honestly say that stash has come to my rescue more than once.

Cinnamon Chip Scones

  • 4 ¼ cups Flour
  • 1/3 cup Sugar
  • 2 tablespoons Baking Powder
  • 1 teaspoon Salt
  • 3 sticks butter, very cold
  • 1 cup Heavy Cream, plus extra for brushing tops
  • 4 Eggs
  • 1 cup Cinnamon Chips (usually in the Chocolate Chip section)

In the bowl of a food processor, add flour, sugar, baking powder, and salt. Pulse to combine.

Dice butter and add to food processor. Pulse several times until butter is mostly pea sized and combined with the flour mixture. Pour into large bowl, and make a well in the middle.

In a separate bowl, whisk together cream and eggs. Pour into the well in the flour and butter mixture and slowly stir to combine. Stir in cinnamon chips.

On a well-floured surface, knead dough a couple of times to form a ball. Roll dough to about 1” thick. You will probably see bits of butter. This is good! The butter pieces are what makes the dough bake up light and flaky. Use a 3” round cutter to cut scones and place on a parchment lined pan. I usually get about 18 scones.

Cover with plastic wrap and freeze for at least 2 hours. Remove scones from pan and place in zip top bag. Keep them in the freezer until ready to bake.

To bake: Pre-heat oven to 400⁰. Place the desired number of scones two inches apart on a parchment lined pan. Do not defrost scones; they are baked straight from the freezer. Brush the tops with extra heavy cream (this makes them so shiny and pretty!), and if desired sprinkle with a bit of sugar. Bake for 18-20 minutes until golden on top.

Serve plain or with honey-cinnamon butter.

NOTE: Yes, you can bake them in their unfrozen, just stirred together form. However, I always have better results with them frozen. They hold their shape better and do not brown as quickly when baking from frozen. If you get impatient and have to bake some right away, keep an eye on them as the cook time will not be quite as long.

Menu Monday – #9

There are some good meat buys at the grocery store this week, and I’ve worked those into our menu. I never got to the Asian style pork tenderloin from a couple of weeks ago when it was so icy and I couldn’t to the store, so that one just jumped to this week.

It may look like a daunting menu this week, but really, there are several aspects that can be done ahead. Just to give you an idea of how it will all work out –  Monday, I’ll marinate the meat, cut the veggies, and make the white rice (for the fried rice) in the morning. Tuesday morning I’ll cube my beef roast and cut veggies, then just pull out the rest of my pantry ingredients so everything is ready for me later. Wednesday, I can pound the chicken into cutlets and make the sauce for my mac before I head to work that afternoon. A quick pan fry for the chicken and boiling the noodles is all that’s left for the evening. And for Friday, there’s not much that’s easier than throwing together a frittata.

MONDAY

Asian Pork Loin with Stir Fried Veggies and Fried Rice

TUESDAY

Beef Bourguinon over Creamy Polenta

WEDNESDAY

Chicken Cutlets with Mac ‘n Cheese

THURSDAY

Leftovers

FRIDAY

Potato and Vegetable Frittata